

BY BEN HERVEY-MURRAY
Fishing from the beach is a wonderful equalizer – you don’t need to be able to afford a boat or fees for an offshore trip, and you get out of it what you put it in. Effort equals reward in the surf. If you get seasick, you’re short of time, have an unpredictable schedule or you just want to enjoy your own space this summer with the family on a glorious West Coast beach, a surf session is the answer.
In the past year, I’ve noticed a significant increase in new anglers looking for basic tuition-type sessions to help get them started. A typical story I hear from new guiding clients looking for this sort of service is of experiencing a couple of boring, disheartening sessions and realizing they’re missing a few pieces of the puzzle to help them consistently catch fish. Most have plenty of freshwater experience but the challenges of surf, tide cycles and locating their target species are a little out of their comfort zone.
So, let’s have a look at what most people struggle with when it comes to surf fishing and how to fix it.

1 Knowing your tides
Understanding the tide cycle is important if you’re fishing any sort of open Pacific beach. You could write a whole book on this subject and still not cover every subtlety relating to how the moon and tide interact, but we can boil the subject down to a few key learnings.
First, most surf species like moving water. If you can time a session to coincide with peak outgoing or incoming tide – usually somewhere in the middle of the high and low-tide times – then you’re likely to find some feeding fish. Personally, I’ve experienced countless sessions when nothing much happens for an hour or two whilst the tide switches or picks up pace from a low or high mark – then the fish turn up in numbers.
This is because most species use moving water to travel and find prey with minimum effort. A big outgoing tide, for example, will transport prey items like sand crabs from their surf zone home out to waiting mouths sat just behind the breakers or in an adjacent piece structure. The fish stage like a trout in a stream, waiting in a deeper glide or hole for an easy meal to drift their way.
With specific reference to Southern California species, I’ve found the moving water theory relevant to any sort of shark, croaker (spotfin, yellowfin and corbina) or surf perch. The only exception being sight fishing for corbina, which is best done on an early-morning minus tide or low water.
On the flip side, the slack water periods (particularly around high tide) when not a lot of water is moving in or out, seem to be preferred by the ray species that enjoy an easy life and tend to feed by grazing like a cow rather than hunting down specific food sources. Bat, butterfly and round rays all fall into this category.
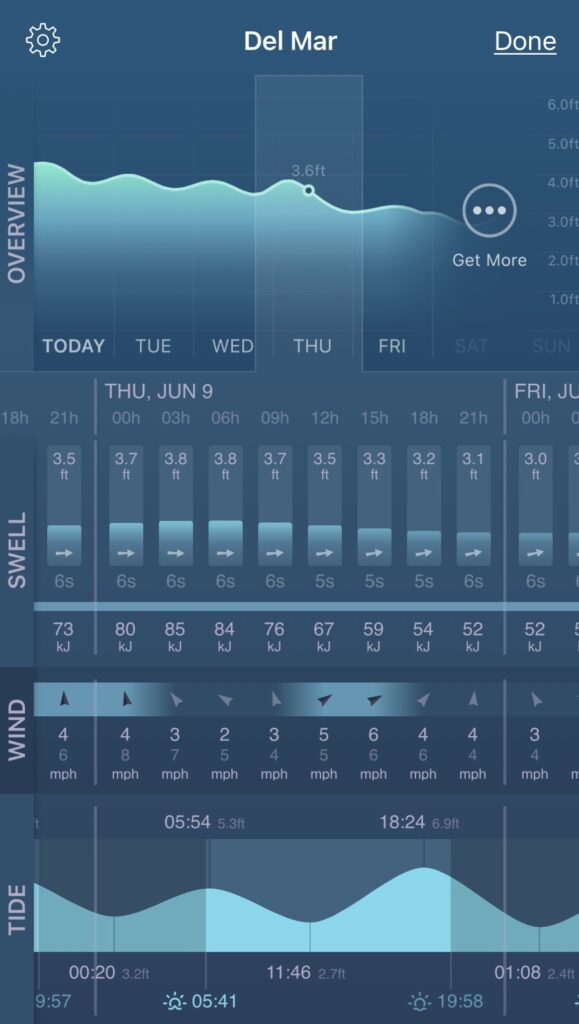
To fully get your head around this subject, first download a good tide forecasting app on your smartphone – one with a visual chart showing the peaks and lows is really useful. Look at these peaks and troughs as periods when the water isn’t moving so much, but when the tide is either ebbing (flowing out) or flooding (flowing in) water is obviously moving more to generate the next low or high tide.
Next, understand that the moon is the primary driver of this tidal cycle. The moon’s gravity is a force that pulls on the earth and its surface water. As the earth rotates, this force is either pulling the water towards the moon (generating a high tide) or letting it fall away (for a low tide) depending on where the moon is in relation to the earth. This gets really complicated when you factor in land masses and different distances from the moon to the earth and their impact on tides, but in general the rule of fishing when the water is moving most will serve you well.
An additional factor to consider is that, at certain times of the cycle, the moon’s gravity will exert even more force on the water movement during the full or new moon periods. Often, these will be labeled as spring tides – this describes when the sun, moon and earth line up for maximum gravitational pull on the earth’s water. These big tides, during the summer months, are often when the grunion runs occur and will generate the most moving water in terms of tidal shifts. A big outgoing tide a few days before or after a spring tide high water event is a great time to fish.
2 Understanding swell height and power
I’m a bit of a surf forecasting app nerd. Several times a day, I’ll check the forecast for a range of different spots to get a gauge on where I’ll be fishing next. I have spots that are fishable when the waves are small (0 – 1ft), medium (2–3ft) or large (3ft-plus); spots that’ll work when there’s a ripping current or when it’s calm, and every combination of these conditions.
The best indicator of real-life surf fishing conditions – what the surf and conditions are actually going to be like to fish – I’ve found is the kilo joule (KJ) rating. This is usually a function of wave height and period (the bigger the wave, the longer the period and the higher the rating) expressed as a number between about 30 and 1200. Lots of surf forecasting apps offer this rating and I rely on this number more than any other data point to tell me how fishable the surf is going to be ahead of time.
Therein lies the key – knowing ahead of time. As I mentioned, I’ll track the swell pattern in the day or two leading up to a session so I know exactly what I’m dealing with when I turn up at beach. As a general rule, when I see a KJ rating of under 200, I know that conditions are going to be favorable with small waves and manageable current. I’ll get away with a ½- or 3/4 -ounce sinker on light line set-ups, for example. A rating of 200 to 400 will provide some challenges with stronger waves and current, and a need for larger sinkers or a spot that isn’t impact by heavy currents and shorebreak.
For example, a shallow sandy beach will see a lot of water moving in and out with heavy current and big waves – say it has a KJ rating of around 400 – whereas a deeper area or beach with a jetty or breakwater to block the swell and current will be less impacted by this and thus easier to fish in these conditions.
A KJ rating of above 500 will likely render an open beach unfishable apart from tackling surf perch close to shore with a large egg sinker. Anything more than 500 or 600 will be very uncomfortable anywhere apart from a beach surrounded by a jetty or breakwater structure. I’ve seen KJ ratings up to 1300, often associated with big winter swells, and the result is a spectacular mess of whitewater and giant waves. Stay at home, unless you’re fishing a harbor.
Conclusion: get a good surf app that shows the wave power in KJ and the wave height. Check this daily and see what each scenario looks like in real life via a beach visit or surf cam viewing. You’ll soon get your head around what are fishable condition local to you, enabling you to plan a family or friends summer session knowing that conditions are going to be acceptable to fish and anglers.
3 Finding the fish
Spotting likely holding areas – holes, troughs, channels and so on – is another element that often goes overlooked. I’m surprised at the number of people who will just pitch up to the nearest spot and set their stall out for the day, regardless of what’s in front of them.
Think of this part of the process as though you are on a hunt. If you were seeking a land animal like a deer or hog to shoot, you’d be unlikely to sit in one spot near the car park all day, hoping your target wanders into view. You’d be out searching for clues and signs, exploring likely areas until you find your quarry. Treat surf species in the same way.
Walk the beach until you see that calmer, flat blue water indicative of a deeper hole. Or maybe a wave stops breaking half-way through the surf zone when it hits a deeper trough. Both are go-to areas for a fun surf session. If you don’t get a bite in first half-dozen casts, move to the next area and repeat until you find fish. Then, remember where you caught the fish and what the water was doing so you can replicate this.
4 Picking the right rigs
When it comes to end tackle, keeping everything simple, light and flexible is a good strategy. A basic Carolina rig with a ½- to 1.5-ounce sinker, 4mm bead, small barrel swivel (not one of those big brass-colored ones or a snap swivel) and 25- to 30-inches of 6-pound fluorocarbon will tackle almost every non-shark surf species in SoCal, corbina and spotfin croaker included.
A size 6 or 8 hook baited with two, three or four small pea-sized sand crabs scooped out of the shore break with a small pasta strainer completes the set-up that I use for all my guided light line surf sessions. I’ll happily use a whole or halved 2-inch Gulp! Sandworm in camo neris or new penny shades, too. This bait and rig combo is easy to use with anglers of all ages and abilities – a short cast into the first trough or hole, and you’re in surf perch or croaker territory.
5 Setting the hook and casting
So you’ve planned a session around the tides and swell, found a likely holding area in front of you, tied a neat C-rig, cast out and got a bite. When it comes to surf perch, they can be a little tricky to hook for the inexperienced angler. They tend to pluck and grab at baits, resulting in those tap-tap bites, especially when you’re on top of smaller fish that can’t inhale the whole bait.
The solution is this: don’t set the hook on the first tap or bang you feel. Give them a second to eat the bait, before waving hello to the fish. When I say ‘waving hello’, this is because an inexperienced angler will often go for the full-swing big bass hookset, whereas a swift-but-not-violent raising of the arm – just as though you were waving hello to someone across the street, but with a rod in your hand – is a much smoother, more efficient way of setting the hook.
The last piece of the puzzle, for lots of surf anglers starting out, is the ability to cast a relatively light set-up a decent distance without tangling. I’m consistently surprised at the anglers who claim lots of experience yet can’t really cast a basic light spinning outfit properly, with all sorts of weird and wonderful techniques employed.
It’s hard to put into words a physical action as specialized as casting a ¾-ounce sinker on a 9-foot light surf combo, but I highly recommend an hour in an empty park or field with your surf combo of choice to get your technique and timing dialed in. Youtube is awash with beginner casting videos, so get your basic grip, stance, drop (the distance from the sinker to the rod tip) and timing right before hitting the beach.
The ability to smoothly cast a good distance, exactly where you want without tangling, will put you onto a ton of extra fish and is one of the main factors in a successful surf session once you have the baits, rigs, location and conditions worked out.
