

BY BEN HERVEY-MURRAY
WON Staff Writer
Smartphones have given nearly everyone a pocket-size camera that goes with you on every fishing trip, but taking an awesome cover-worthy shot of your latest catch isn’t as easy as pointing and pressing the button. Here are the tips and tricks used by a professional to shoot WON covers and features.
1 – CLEAN YOUR LENS, SET UP YOUR CAMERA & PLAN YOUR SHOT
Before you’ve even caught your fish or hit the sunset golden hour, take a few seconds to plan your shot. Let’s assume you’re confident of getting lots of bites and catching something pretty quickly… now is the time to work out how to get the best photo, not when you’re dealing with a live fish.
The first consideration is background. Work out the big issues first; for example, if you put that rocky point, tree line, jetty, pier, oil rig, boat or harbor in the background, will you be burning the spot for others? Keeping hot spots to yourself and not publicly highlighting the exact area you just bagged a whopper from shows good ethics and respect to others who enjoy the same fishery.

Once you’ve identified a suitable background and how this will line up for your impending catch shot, make sure your phone is in an accessible pocket and the camera photo resolutions settings are set to max. If you have an iPhone, turn on the Live option. On most iPhones, load up the Camera app as though you’re about to take a photo and make sure the icon in the top right, made up of small dotted and solid concentric circles, doesn’t have a line through it. Tap the icon if so and yellow writing saying Live will appear briefly.
The Live function essentially records a very short video when you’re taking a photo and automatically selects which frame to use from the video, rather than relying on getting it right with one shot. It’s useful because, as we’ve all experienced, a shot with someone closing their eyes or similar doesn’t make a great photo. But if you go to the Edit function of a photo taken in Live mode, you can select from several frames taken before and after the main photo, one of which will be the perfect shot. It’s a great get-out-of-jail trick when you’re photographing fish quickly.
Now clean your lens with a proper cloth or the cleanest, driest, softest material you have on your person. Check the lens or lenses for greasy fingerprints or marks and reclean until it’s spotless, and carefully put in your driest, cleanest pocket or zipped compartment. If you ever see catch photos with a milky, blurry effect, this is often because of dirt and grease on the lens.
2 – FRAMING & COMPOSITION
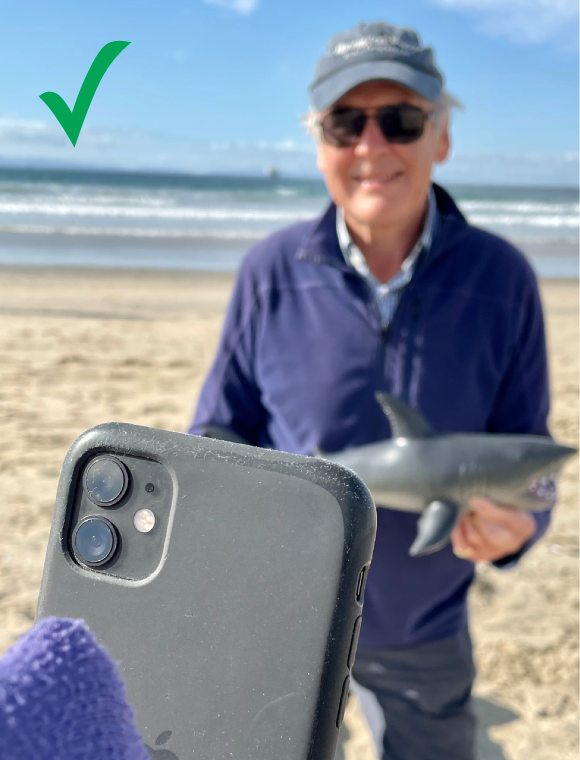
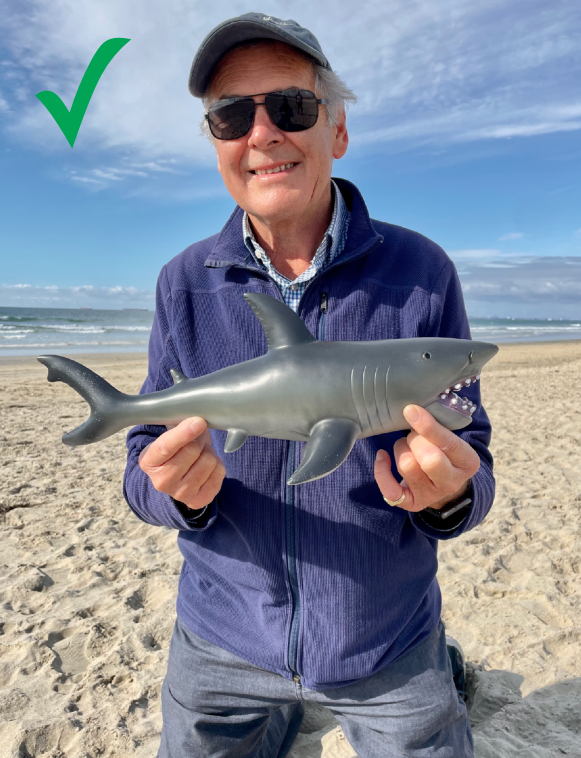
Probably the most common way to make a catch photo extremely average is to not pay attention to framing the shot correctly. The first two mistakes I see a lot are standing up when the person holding the fish is kneeling or sitting, thus creating a photo that looks down on the angler with lots of deck or bankside in the photo and not much sky or scenery. The second is simply standing too far away, creating a photo where the person holding the fish appears to be an afterthought in the shot, not the main event.
First, always make sure you’re shooting on the same eye level as the fish and angler. Kneeling is a great option for both fish and photography purposes, giving you a stable platform and you can easily put the fish down if it gets lively or you need a rest. Standing straight up holding a fish, unless on a boat or wading, often looks awkward. Doesn’t end well for the fish if dropped, either.
Next, physically move close enough to the fish and angler so the framing is at least somewhat reasonable before taking photos. Make sure the angler fills the frame, not half or one third of it, but leave a small 10-20% gap around the edge between frame end and angler / fish to allow you to crop the photo and adjust for wonky horizons. Don’t rely on cropping or digital zoom functions to get closer up – a photo loses a lot of quality and clarity by doing it this way.
Also, consider if you want to take the photo in landscape (horizontal) or portrait (upright) formats. Personally, I tend to shoot fish that are longer – say a shark or lingcod – in landscape formats so the fish is able to fill the frame; and I use portrait mode for shorter, rounder fish like perch, croaker, trout, panfish, rockfish and bass. Work out what is going to look best with your target species, and consider taking a few frames in both formats to see what works.
Lastly, work out what’s going to look great in the background and foreground of your photo, as discussed in the first stage. Be bold and decisive. Move yourself or the angler a few degrees one way or the other to make sure they don’t have a tree, center console or building growing out of their head, or move the angler to give the fish a great clean background to show it off to the max. Don’t just kneel down and rack off a few shots – take a second to look and consider what it is going to make this photo look great.
3 – LIGHT AND FOCAL POINTS
So, you’ve worked out what’s going on in the photo composition-wise. Now let’s look at some more technical aspects that really make the difference between an average shot and a great one. The first is lighting.
We’re lucky to get a lot of bright sunlight here in California and this can be a blessing and a curse, so let’s start by looking at how we can use sunlight to our advantage. Say it’s mid-morning and the sun is rising above the palm trees and you’ve just caught a nice corbina on the beach. By correctly positioning the fish and angler to be in full sunlight, the fish is naturally lit and will look great. But if the fish is angled so the side being photographed is in shadow, the fish will appear dull and dark in the photo. The same applies to the angler.
In most cases, you want the sunlight to “catch” the fish and angler so they’re well lit, which means the camera will be able to pick up more details and colors compared to a fish in shadow. If you’ve ever seen a photographer’s assistant wielding a reflective dish or shield to bounce sunlight onto a subject to light them, they’re trying to achieve the same thing.
Once you’re confident the fish is correctly lit and framed, work out your focal points, which describes the point where the camera is focused on.
Almost always, the focal point of a catch shot should be the eye of the fish, not the angler. On an iPhone, you can set the focal point by pressing and holding a finger on the screen where you want the focal point to be. A yellow square and the words AE / AF Lock will appear after a second or two of pressing on the screen. This stands for Auto Exposure and Auto Focus.
By setting this focal point, you’re telling the camera where you want the main focus to be in terms of clarity and exposure, and for catch photos this is almost always the eye or head of the fish. If you don’t set this, a smartphone will usually automatically detect the angler’s face and set this as its main focal point, leaving the fish out of focus. This isn’t ideal.
4 – FLASH OR NO FLASH?
In daylight hours, there’s no need to worry about the flash for most catch shots. But, as the sun goes down, your flash is essential. On an iPhone, you can tell if the flash is automatically ready to fire (when it senses there’s not enough light) by looking at the top left of the screen with the Camera app open. If the white lightening icon has a line through it, the flash is disabled. No line? It’s ready to fire automatically if needed, which is what you want. Tap to toggle between on / off.
The key to nailing a great night catch shot with a smartphone is to eliminate as many of the other light sources as possible. Turn off all head torches and lights just before you take photo. In my experience, any significant light source other than a camera flash will confuse the camera sensor somewhat, leading to it trying to take a photo without flash by lengthening the exposure (the time the camera uses to take in light to take the photo) This leads to blurry photos as the camera takes a second or two to take in all available light, during which time it is likely the angler or fish move slightly, creating a blurry effect.
Remember the Live function mentioned earlier? This can help you out here with by selecting a non-blurry frame to use as the photo but it’s better to not rely on this. It’s far better to leave the lighting entirely down to the camera and flash, and the best way to do this is to make the scene as dark as possible before taking the catch shot.
The only time when I don’t use a flash at night is when fishing with a group when we often bring a flood light along to light up large sections of the beach. This is basically like shooting in daylight and the camera will sense that it has enough light to fire off a shot without added flash light. Either way, remembering to set the focal point is really important at night as it helps the camera to determine what combination of flash and exposure is going to give the best result.
5 – EDIT AND SEND TO WON!
The last stage of taking a great catch shot is editing. On an iPhone, open your best catch photo in the Photos app and hit Edit in the top right. The crop function on the bottom of the Edit screen will allow you to level out any wonky horizons and create a nicely-balanced photo.
The various other photo editing functions will also allow you to manipulate color, exposure, brightness, shadows, clarity and definition in your photo. If that’s all a bit much, use the Auto function but be aware of over-editing the photo so the colors or lighting aren’t realistic. Have a play with this for a few minutes to work out what looks best. You can fix lots of problems with photos in the edit stage and bring out some of the color that might have been lost on a grey day or in low light.
Shot an awesome cover-worthy fish? Now email it to editors@wonews.com with lots of details right away. We receive lots of catch shots every week, and the better the photo, the greater the chance it’ll be used prominently.
