THE PENN JIGMASTER is a classic workhorse that many modern reel designs are based on, and it’s a great platform to familiarize oneself with basic reel maintenance. PHOTOS BY TONY ROBINSON
Advertisement
BY TONY ROBINSON Special to Western Outdoor News
VALENCIA – You get that call; the water temperatures are holding steady for a sweet offshore bluefin, yellowtail or white seabass bite. It’s go time. But your gear hasn’t been touched since last season.
You rush out to the garage to check on your rods with reels still attached. Sure, you washed them off after your last trip, but when you turn the handle, you get a little more resistance than expected. Something’s not right, but you know you can’t just walk into your local shop now to get your reel looked at and serviced at short notice. So what to do?
If you’ve never opened up a reel to do any basic maintenance, you’re doing yourself a major disservice.
True, not everybody thinks they have the patience or steady hand to do it, and most of the time, a light freshwater rinse will suffice. But, if there was ever a time to dig in, now is the best time to do it and learn a little bit about these mini-engines we tend to over-torque and expect to wind in fish ten times its recommended range. The greatest service is learning some basic handywork to extend the life of your reels over the course of your fishing career.
For this segment, we’re going to focus on generic saltwater (conventional) reels. But this
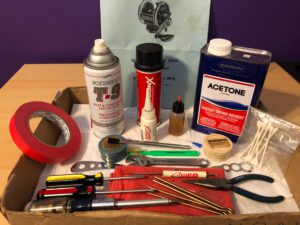
TOOLS OF THE TRADE – A lot of this stuff is already sitting around the house, and in many cases with the chemicals and cleaners, it comes down to whatever you’re comfortable with
project works for most other type reels as well. A lot of the internals are similar, by name and/or function. As fishermen, we have about as many reel options with as many bells and whistles as a car driver. And whilst a car has a basic purpose, to get you from A to B, a reel has a similar goal to bring a fish to gaff. Both do with a series of gears, moving/rotating/sliding parts and breaking systems that require a little bit of regular maintenance and check-ups to make sure they are in good working order when you need to use them.
Here are some essential items you’re going to need:
Hardware:
• screwdrivers (I prefer a ratcheting type with a magnetic tip or a cordless version and multiple phillips and flat-head bits)
• needle nose pliers
• adjustable crescent wrench
• that bag of tools that comes with almost every reel
• a cafeteria-type tray or retired baking sheet
• shop rags or paper towels
• wire bush
• Q-Tips
• modified paper clip to pull bearings or move other small parts
Software:
• reel grease/lube
• brush (to apply grease/lube)
• reel oil (Reel-X, TSI-321, Rocket Fuel, etc.)
• acetone, Break Free, break/carb cleaner (solvent to break down/clean grease)
• corrosion/rust protection lubricant/spray (Corrosion-X/Boeshield, T-9, etc.)
Online/visual resources:
• Reel Schematic (usually comes with reel or search manufacturer websites)
• Online Reel Repair/maintenance websites (plenty of reputable sites)
Useful, not required, but highly suggested “extras”:
• rubber gloves
• eyewear
• compressed air (yep, from the computer section)
• magnetic shop bowl (to hold small parts)
• bearing pullers (highly recommend: “Bearing Bad” tool).
• micro screwdriver set
• camera
• pen & pad for notes
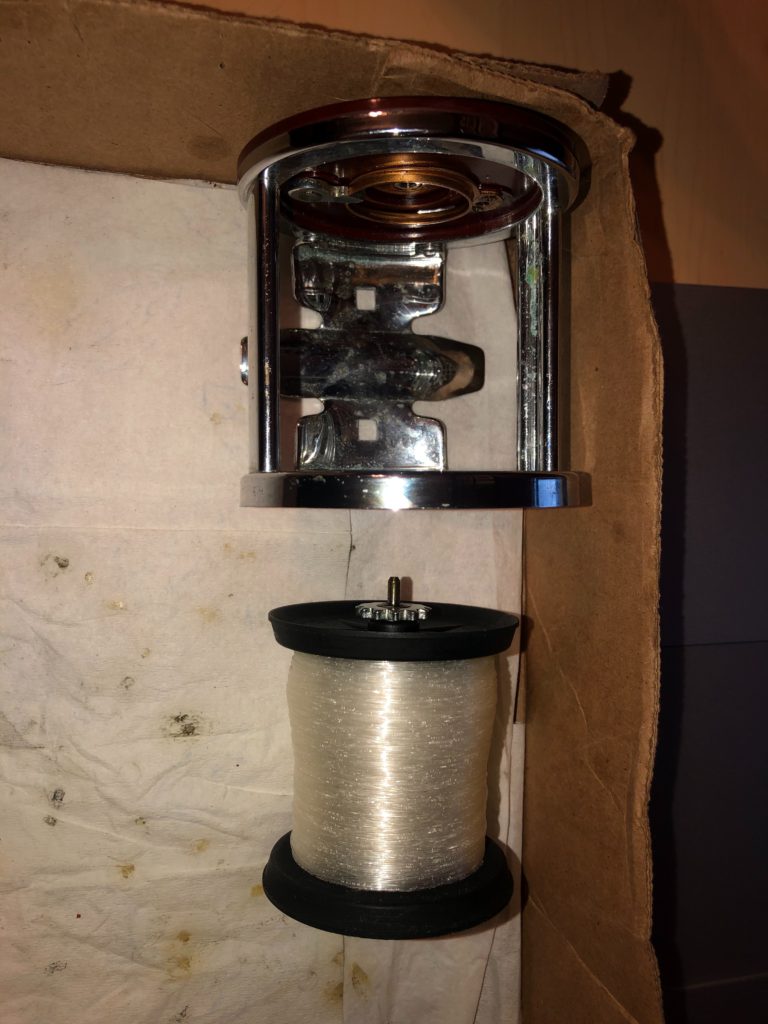
ONCE THE SPOOL IS OFF, a lot of the internal components are accessible for cleaning, repair or replacement.
First a stern warning: you are messing with chemicals, some of which are pretty strong and can be dangerous to use. You have many options, seek those you are most comfortable with.
Advertisement
Second, a strong suggestion: Choose a well-lit, well-ventilated area to work in. Your eyes and lungs will thank you, and it will be much easier and productive to work in a designated, organized and well laid out area. Trust me, with the amount and minuscule size of internal reel parts, this is not something you wanna do in your carpeted living room in front of the TV.
If you don’t already have a reel in mind or just want to get started for the experience, I’d strongly suggest finding a used Penn 500 or similar reel to work on. Not only is this a classic and still fully functional, it’s available and a great workhorse of a reel. It’s the one most recognized and arguably used as a blueprint to build on. And for good reason, it’s also easy to take apart and put back together again.
Now, focus on some of the goals in mind from start to finish: disassembling the reel. checking for excessive wear or broken pieces that may require replacing, cleaning, addressing corrosion, applying grease and oil in all appropriate areas and finally putting it all back together again and getting it back out on the water. This is a simply maintenance job to keep your reel in good working order.
Take out the reel schematic and get familiar with the components. It may also come in handy when you’re ready to put it all back together. Speaking of which, now would also be a good time to take out your camera phone. You can take some pictures of the reel at different stages of taking it apart to help you remember when reassembling.
Start with the handle side. This is the gear side of the reel mostly responsible for the “engine” that does the bulk of the work. The Jigmaster has a quick take-apart feature which is a simple thumb screw that you unwind, pull out and rotate the sideplate to unlock and pull the whole assembly apart from the reel. With most other reels, it will be simply a series or 4 to 6 screws to unscrew and pull the side plate off. Put the rest of the reel (spool, frame and other sideplate) off to the side.
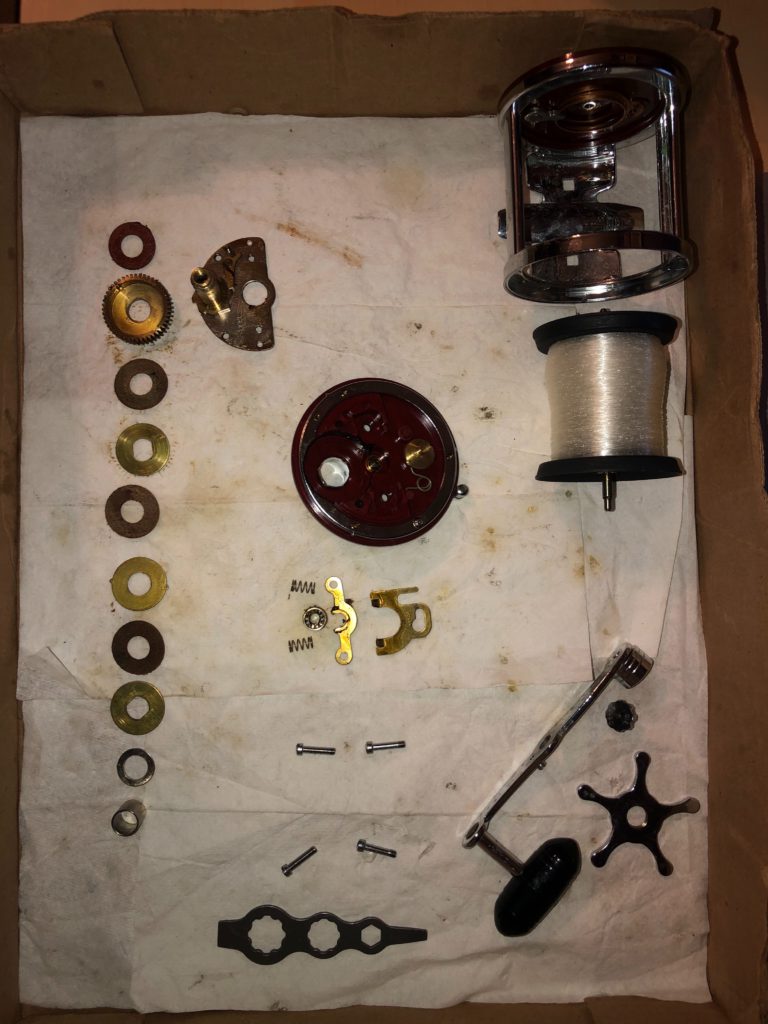
It’s crucial to be organized in how you lay your parts out as you disassemble a reel. Try to
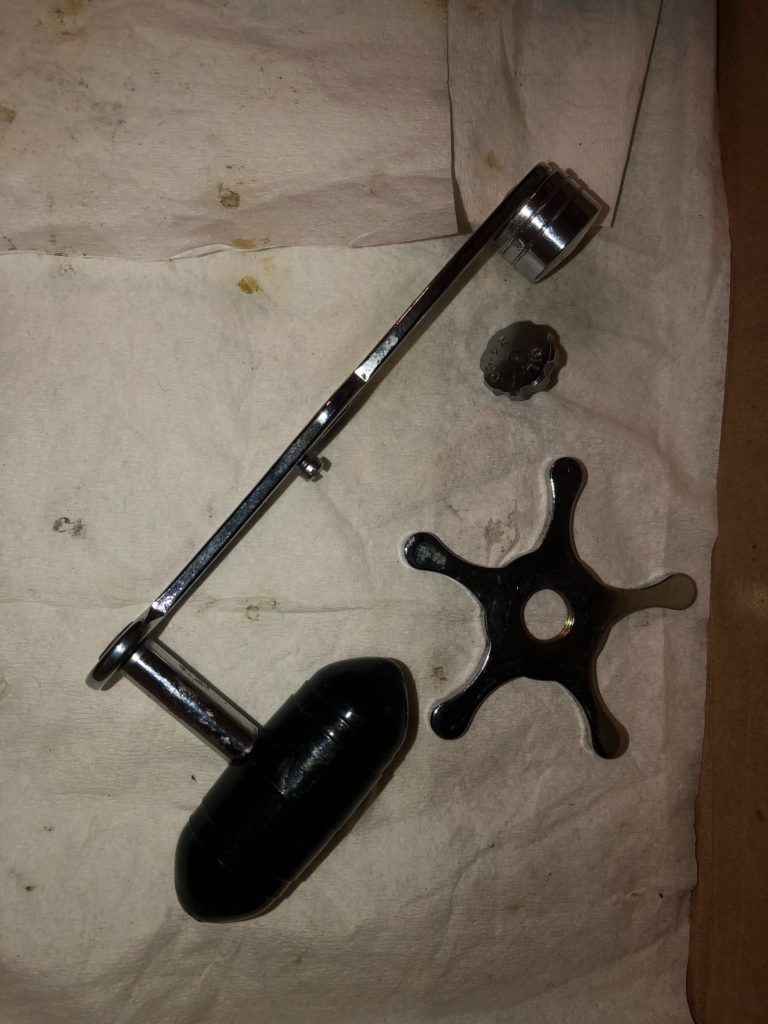
THE HANDLE AND STAR (where applicable) are among the first parts to remove.
keep like or fitted parts close to each other. It will make it a lot easier when you try to put it all back together. This is also why it’s great to have a large working area or tray to keep things organized and nearby.
The handle side is usually the business side of the reel where you’ll need to pay the most attention to and do the most work, so keep that camera handy and try to stay focused. Refer to reel schematic to get the gist of the Greek I may be throwing at you shortly.
The first parts you need to take down are the handle and the star. There is a larger handle nut to keep the handle in place and a smaller locking screw to hold the handle nut in place. In the case of the, Jigmaster you’ll need a Penn tool (simple item that comes with them) to remove it. Unwind the drag star and set the whole assembly together to the side. The bridgeplate, which houses all the gearing parts will be secured to the reel sideplate by a set of screws.
In this example, it’s a set of four screws. Lay the sideplate down on a flat surface as you untighten the screws to release the bridgeplate assembly. Carefully take start taking the two pieces apart and note where things are on the bridgeplate and the sideplate you just lifted.
You don’t have to undo every single part. Some assemblies, such as the jack handle assembly can be left attached, it’s up to you how far you want to break down the reel and learn. Certainly if any parts need to be replaced, you will have to disassemble them. The goal is to expose enough of the reel so you can get to the next phase of the process which is inspection and cleaning. Take a look at the reel parts you’ve laid out.
The next step would be to clean off any excess grease, oils, dirt, etc. from inside and out of the reel. Use the shop towels and use whatever solvent or cleaner you are most comfortable with using to clean off those parts. For things like bearings, use the cleaner to flush any dirt or grease out of them to improve free spool and handle rotations depending on where the bearings are situated in the reel.
Personally, I like to use acetone on a cloth, with my hands in rubber gloves to wipe everything down. For harder to clean parts, a little soaking and brushing or flushing with compressed air might be in order. I want to re-lube, re-oil a fully cleaned reel, and this does a nice job of cleaning everything off. Be sure to use those Q-tips dipped in your cleaning solvent to get to some of those hard to reach corners of the reel.
STAYING ORGANIZED and keeping key parts together is paramount, especially when it comes to putting the reel back together. PHOTOS BY TONY ROBINSON
This is a great time to inspect your reel parts, free of any dirt. Anything that appears damaged or worn or you think needs replacement, make a note of it. If you don’t have parts available, then plan to order online or go to a tackle shop that stocks reel parts. Bring your worn parts along with your schematic so you know what the part numbers are to order. In most cases, the only thing you may need to replace on a regular maintenance project are the fiber drag washers. Otherwise, a good cleaning and brushing may be enough to revive the washers and reuse if they’re still in good shape. If you note any buildup of salt or corrosion, take a wire brush and gently go over the affected areas. If you can wipe it down and it comes clean, or there is no pitting or deep corrosion issues, you might be good to move on. If there’s enough damage, replace the parts. Don’t skimp on this part of the process. You’ll definitely pay for it later at the rail.
With everything cleaned up and ready to piece back together, it’s time to start re-lubricating the reel. Any bearings or bushings in the reel are essentially the only parts you’ll need to hit with reel oil. With all the higher and more specialized blends that exist (Reel X, TSI 321, Rocket Fuel, etc.) the application is very simple and sparing, one drop is all you need. Otherwise, you may get a mess inside your reel from all the excess.
Next, any moving parts, especially any gearing or sliding parts can use a nice coating of reel grease (Cal’s, Penn and Shimano, etc.). Use a small hobby brush to apply a thin coat. Again, avoid applying too much as it could end up splattered around the inside of the reel. Wipe the inside of the spool and spool shaft with something like Corrosion-X or Boeshield T-9 to coat and protect the entire (metal) spool and aid in adding a bit of corrosion resistant film on it.
Lastly, you will want to check your drags. Gently wipe down the metal washers to clean them up. Take a look at the fiber washers and see if there’s any damage to the fibers or if they appear flattened out or worn. If they aren’t in good shape or you’re not sure, then buy a new set of washers to replace them.
Now you’re ready to start putting your reel back together. Start working backwards from the way you disassembled the it (see where laying things out in an organized fashion may help?).
Keep your pictures or the schematic handy to assist with the reassembly. Apply a small amount of grease to any screws and screw holes, and do not overtighten anything. There’s nothing worse than stripping out threads and having to replace major parts from going “stupid tight” with your re-assembly. If you have any issues, remembering how the pieces went back together or you any have extra parts that you don’t know what to do with, refer to your visual resources.
After it’s all back together again, check the reel to make sure it’s back together properly. Engage and disengage the spool. Spin it to see if you get a good amount of freespool. Engage the reel and turn the handle. Does it move the spool when you crank it? Does it sound like the gearing is meshing properly? Does anything sound loose or not assembled correctly? Lastly, tighten the drag star, engage the gear and try to turn the handle while holding the spool to make sure you have drag tension and the drags are working.
Congratulations! You have now effectively self-serviced your first, hopefully of many, fishing reels! While the example we used was a conventional, saltwater reel, the same philosophy and steps can be followed for just about any style reel that exists.
Be forewarned that some reels are built with a bit more complexity than our example, but the same tips above would still apply for servicing your other reels. At least give it a try and learn how to administer a little bit of TLC to your toys while saving some time and money.
Also, know the worst case scenario, all major reel manufacturers have service departments and many tackle shops have reel repair or individuals that are very familiar with ziplock baggies filled with reel parts and know exactly what to do with them.
Tony Robinson resides in Valencia and is a long-time field staffer and charter master for Izorline.